
17 — Structuring an App: Building Launchpad
Every PoshUI app starts as one .ps1, and that's the right way to start. Then someone else wants to run it. Then a colleague asks for "just one more script". A few months later the file is 900 lines long and the real work is tangled up in the buttons.
This guide is about the step after the single file: how to lay out a project so other people can run it, other admins can add to it, and you can still find your way around it next year. It walks through Launchpad, an example app that ships in the release package (Examples\Launchpad\). Double-click Launchpad.exe and keep it open while you read. Everything below is something you can click.

That's half a minute of it. Notice what you don't have to do: build a page or write any UI for each script. Launchpad builds each script's page and form from the script itself. The workflow stops at an approval, waits (it would survive closing the app), and carries on from the history page. Section 2 shows how a plain script becomes a page; section 3 how a workflow asks, waits and decides.
What Launchpad is, and isn't
It's a learning example: a small but complete PoshUI app, built the way you'd build your own. Scripts you run on their own, Workflows that chain them with questions and approvals, Activity for every run, Settings, light and dark.
It isn't a toolkit. The scripts and workflows inside are stand-ins, there to show each pattern once. Keep the structure; replace the content with yours.
This page is the tour
The full reference ships with the example: Examples\Launchpad\App\README.md. It covers every rule for scripts (names, icons, admin, results), every workflow step option and route, the settings in config.psd1, what Check.ps1 checks, and how to move Launchpad out of the PoshUI folder. Keep it open when you write your first script.
1. The one idea
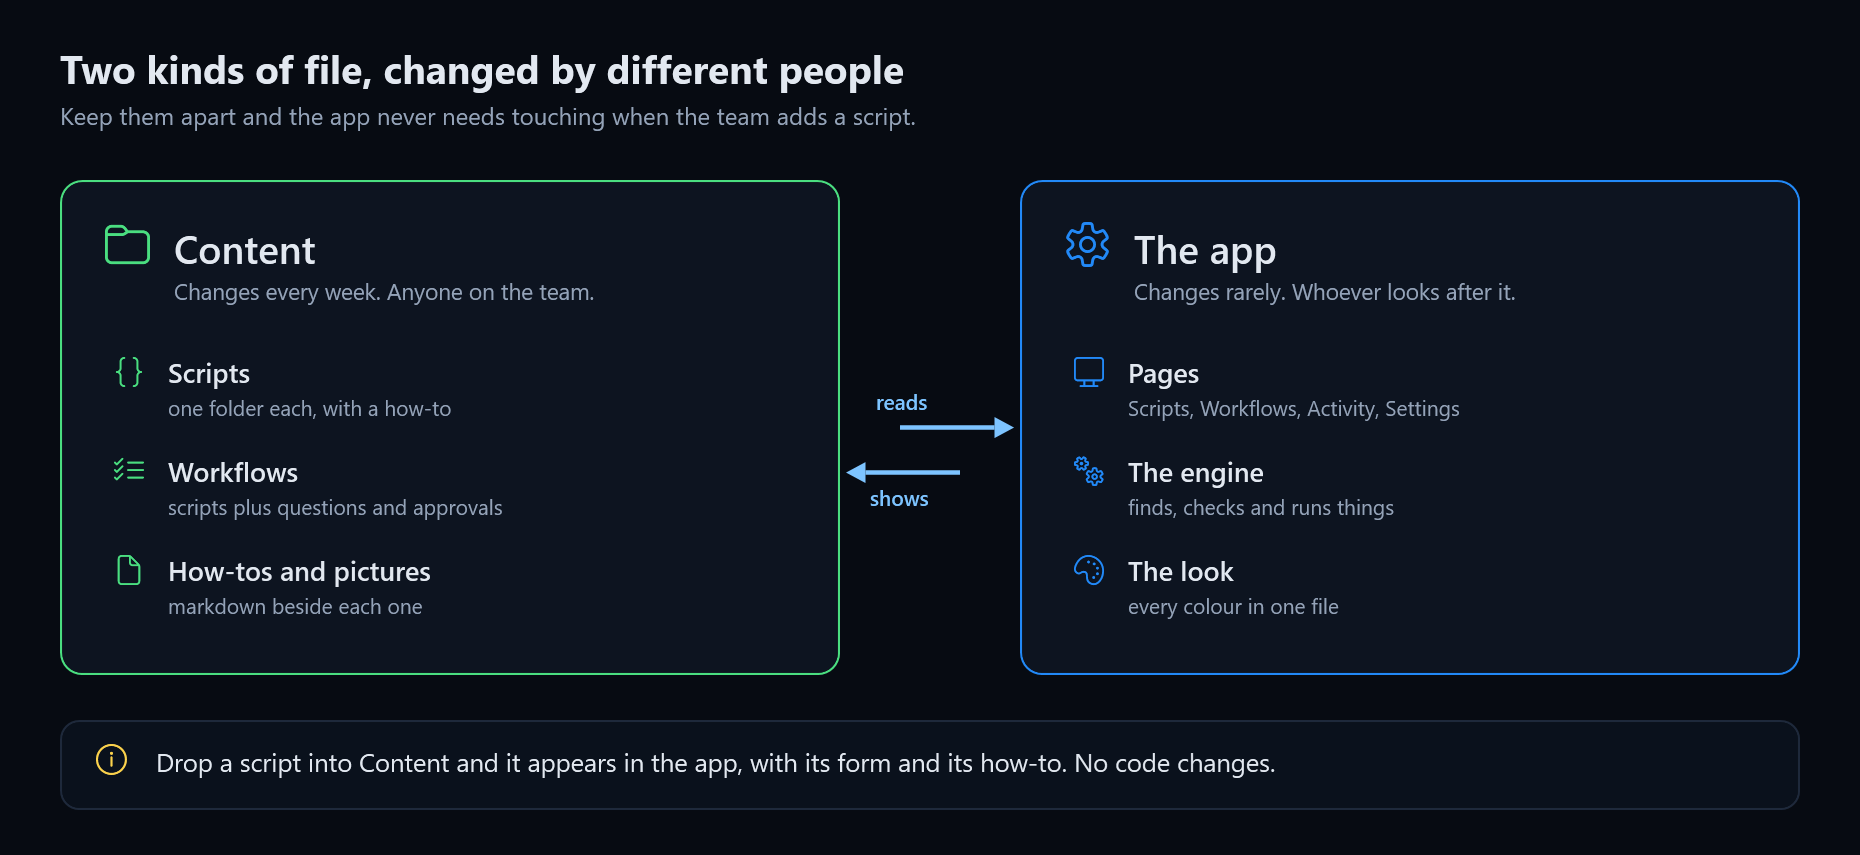
Launchpad has two kinds of file, and they're changed by different people at different times.
Content is the scripts, the workflows and their how-tos. The team adds to it every week. The app is the pages, the engine and the colours. It changes rarely, and only when the app itself should behave differently.
Keeping those two apart is the whole trick. When someone drops a new script into Content\scripts, it appears in the app with its own form and its own help, and nobody has to open the code. If you remember one thing from this guide, make it that.
Here's how the folder reflects it:
Launchpad\
  Launchpad.exe    the app
  Content\         yours: scripts, workflows, how-tos
  App\             the app itself
2. Writing a script for it
This is the part you'll do most often, and the good news is that there's very little to learn. A Launchpad script is an ordinary PowerShell script. You write it the way you'd write any script, and Launchpad reads it to build everything else.
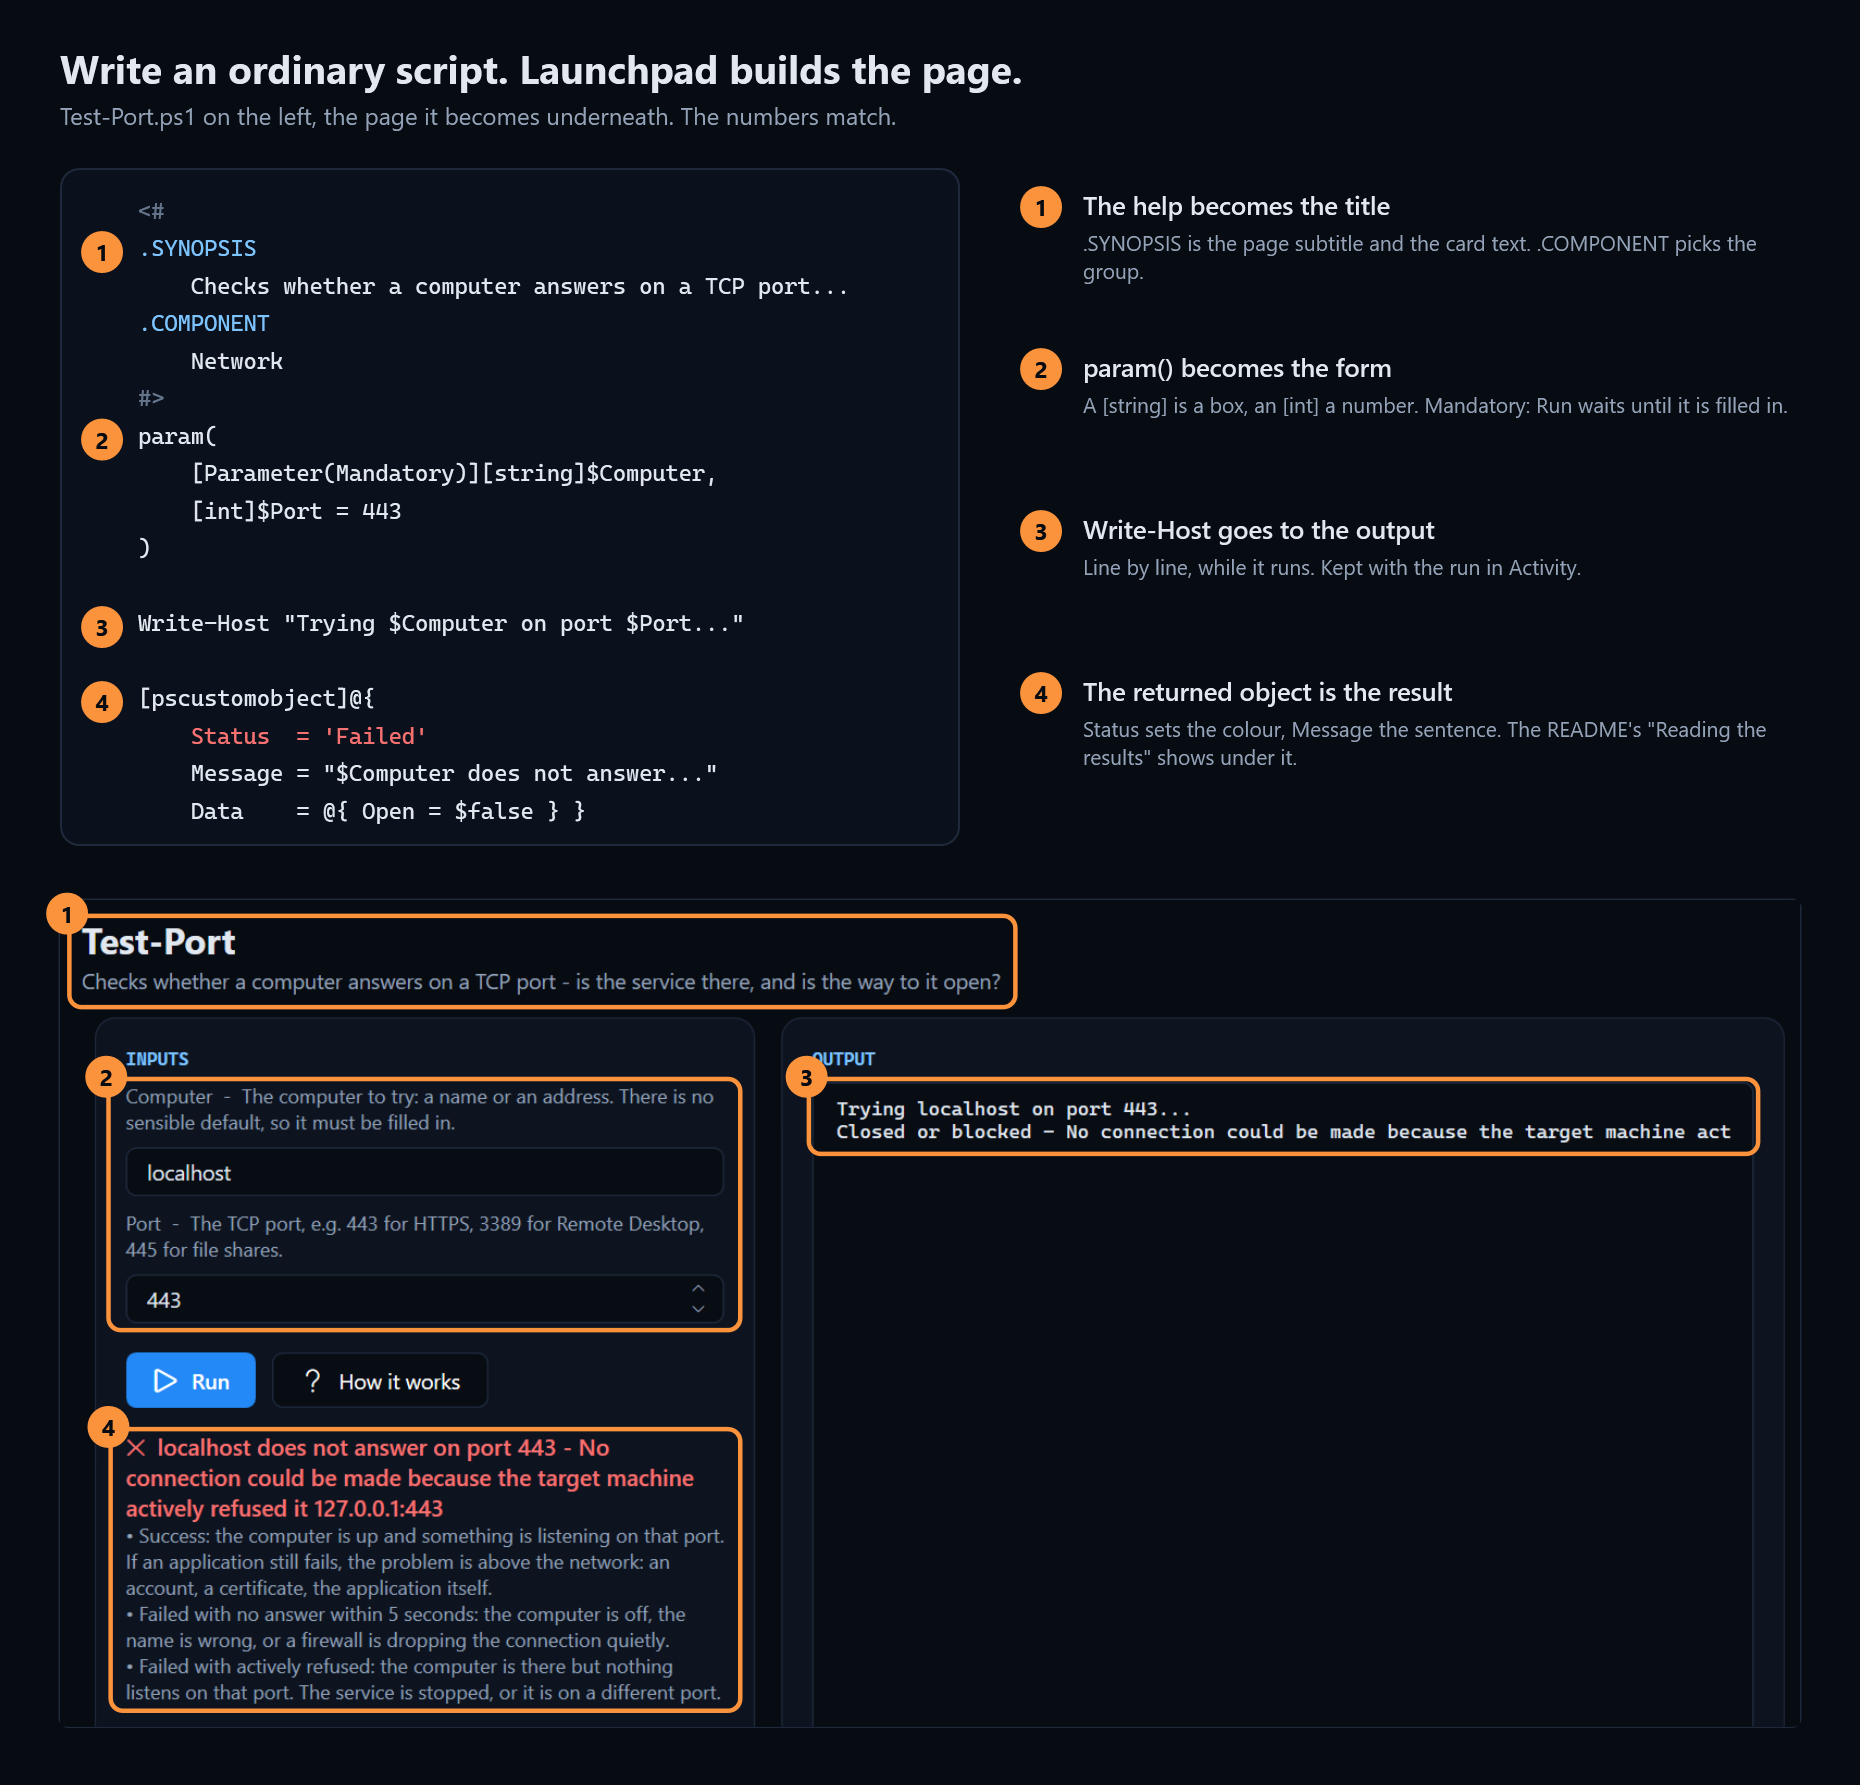
- The help at the top becomes the card.
.SYNOPSISis the description, and.COMPONENTdecides which group it sits in (Network, Disk, whatever you like). - The
param()block becomes the form. A[string]gets a text box, an[int]a number, a[switch]a toggle, a[ValidateSet()]a dropdown, and a path gets a file or folder picker. Mark a parameterMandatoryand Run waits until it's filled in. The full list is just below. Write-Hostlines show up in the output, live, as the script runs.- The object it returns with a
Statusand aMessageis the result.Status(Success, Warning, Failed or Skipped) colours it,Messagesays what happened, and optionalDatais for the next step to use. Other objects it outputs just go to the output.
[pscustomobject]@{ Status = 'Success'; Message = 'server01 answers on port 443.'; Data = @{ Open = $true } }That's it. Put the script in a folder of the same name, Content\scripts\Test-Port\Test-Port.ps1, add a README.md beside it for the How it works window, and it's in the app. The sample Test-Port is the one to copy: its comments point out every part.
Which parameter becomes which input
| You write | You get |
|---|---|
[string]$Name | a text box |
[int]$Count = 10 (also [long], [double]) | a number field, pre-filled with the default |
[switch]$Force or [bool]$Force | a toggle |
[ValidateSet('Csv','Html')] on any type | a dropdown of those values |
[ValidateScript({ Test-Path $_ -PathType Container })] | a folder picker (-PathType Leaf: a file picker) |
[System.IO.DirectoryInfo] / [System.IO.FileInfo] | a folder / file picker |
a [string] named Path, Destination, or ending in Folder or Directory | a folder picker |
a [string] ending in File, Zip or Csv | a file picker |
[object[]]$Rows, [hashtable], anything else | nothing to type: a workflow step hands it in |
The first row that matches wins, so a [ValidateSet] beats everything else. [Parameter(Mandatory)] on any of them makes Run wait until it's filled in, and each .PARAMETER help line shows above its field. A default the app can't work out without running the script (like [Environment]::GetFolderPath('MyDocuments')) shows as a hint, empty: Documents; leave the field empty and the script uses it.
A script with a mandatory parameter of the last kind can only run inside a workflow, so it leaves the Scripts page and is reached from its workflows instead.
A few habits make a script pleasant to use:
- Ask for things up front. There's no keyboard while a script runs, so take everything through
param()rather thanRead-Host. (Check.ps1will spot aRead-Hostfor you.) - Say what happened in plain words. "The site is up, but slow from here (2.4 seconds)" beats "HTTP 200 2400ms".
- Add a picture to the how-to when it helps. Put a PNG next to the
README.mdand writeon a line of its own. It shows up full width, with your caption underneath.
3. Workflows: scripts plus decisions
Some jobs are more than one script. A troubleshooter checks one thing, then decides what to check next. A publishing job needs someone to say "yes" before it goes live. That's what workflows are for.
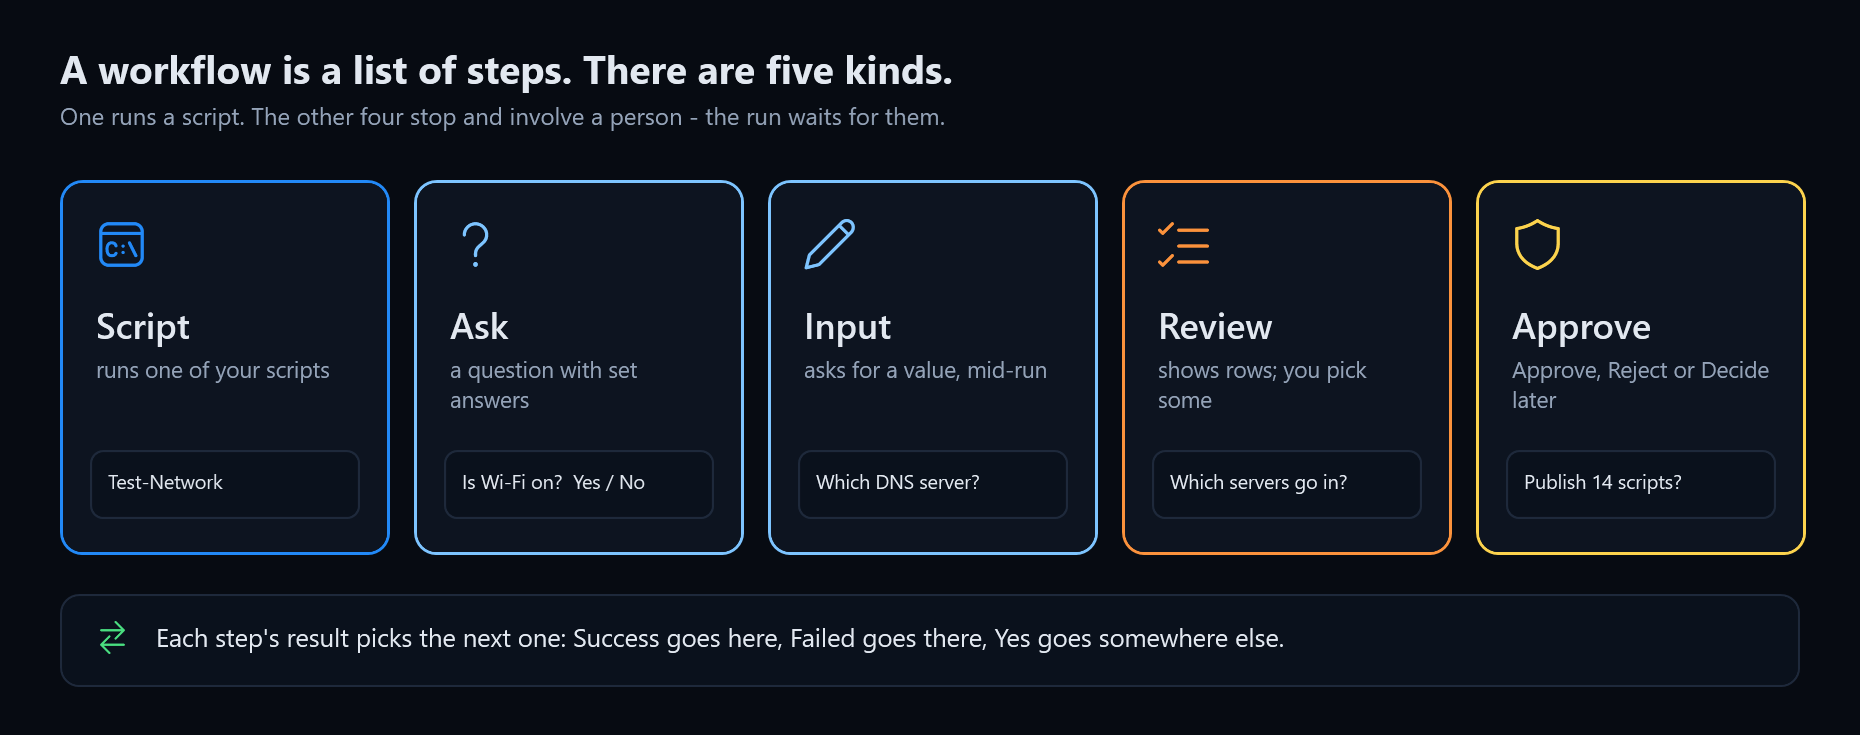
A workflow is a list of steps in a .psd1 file. Most steps run a script. The other four bring a person in: a question, a request for a value, a list to pick from, or an approval. The run waits for them, then carries on.
What makes it a flow is that each step's result picks the next step. Here's the start of the troubleshooter that ships with Launchpad:
@{ Id = 'net';  Script = 'Test-Network'
   Next = @{ Success = 'dns'; Failed = 'wifi' } }          # connected? check DNS. Not? ask about Wi-Fi.

@{ Id = 'wifi'; Ask = 'Is Wi-Fi turned on, or the cable plugged in?'; Choices = @('Yes', 'No')
   Next = @{ No = 'done:Turn Wi-Fi on, then run this again.' } }
Read it out loud and it makes sense: test the network; if that worked go to dns, if it failed go to wifi.done: ends the run with a message for the person. Its how-to includes the whole route as a picture:
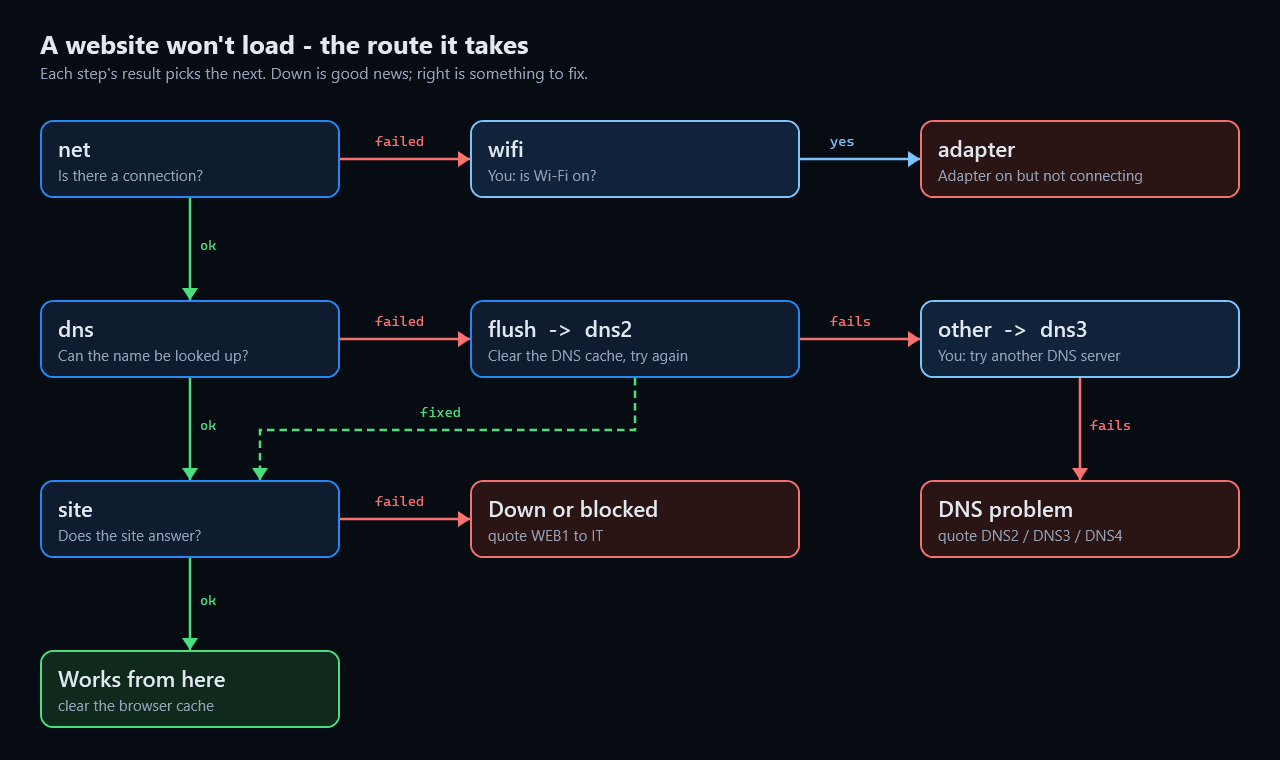
Passing things from one step to the next
People usually ask this next: how does the next step get what the last one found? (And how does the run get what the person typed before it started? A workflow lists its Inputs, and they become the form on its page: Inputs = @( @{ Name = 'Version'; Default = '1.0.0'; Help = 'The version number' } ).)
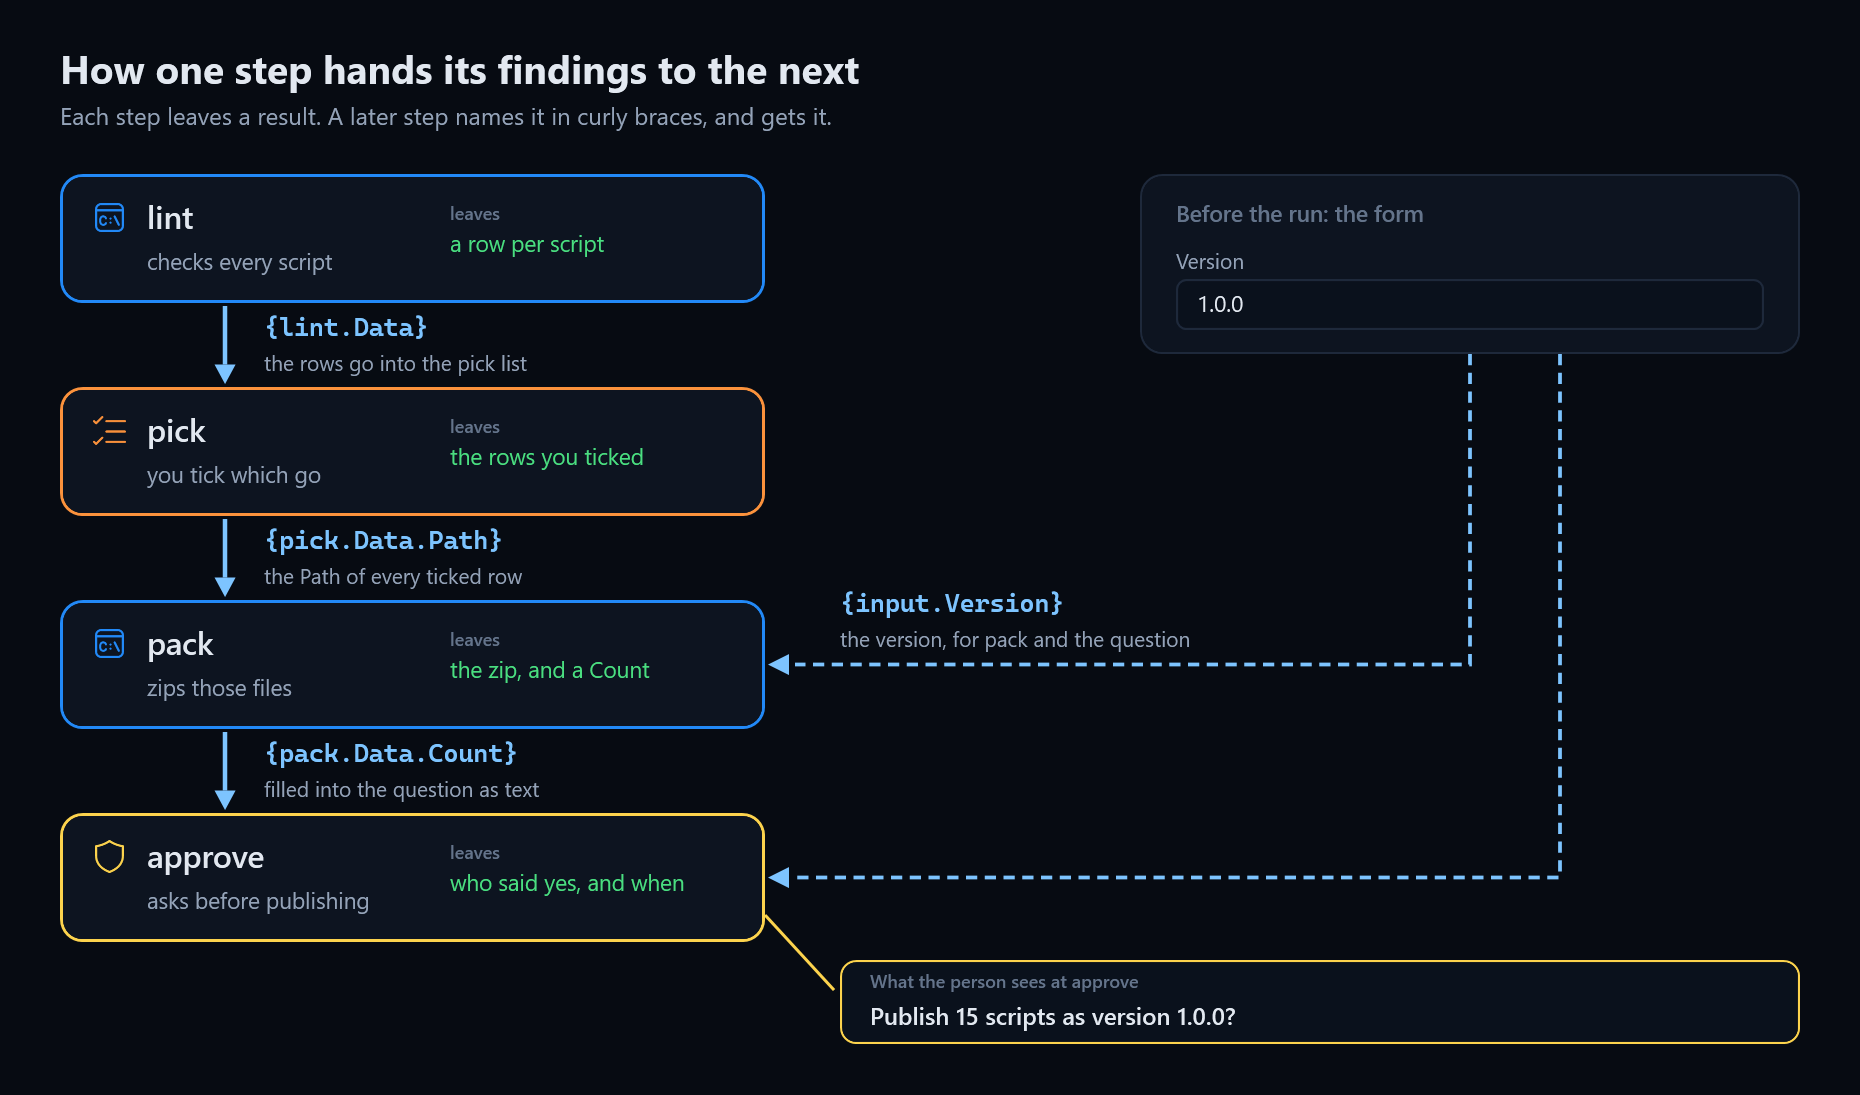
Each step leaves a result behind, and a later step points at it by name in curly braces. In the picture, each arrow is labelled with the reference that carries the value. {lint.Data} means "what the lint step found". {pick.Data.Path} means "the Path of every row you picked". {input.Version} means "what was typed into the Version box before the run started".
@{ Id = 'pack'; Script = 'New-ScriptPackage'
   Params = @{ Files = '{pick.Data.Path}'; Version = '{input.Version}' } }

@{ Id = 'approve'
   Approve = 'Publish {pack.Data.Count} scripts as version {input.Version}?' }
On its own, a reference passes the real thing: the actual rows, the actual path. Inside a sentence, like the approval question above, it's filled in as text. Launchpad checks that every reference names a real step or input when it starts, so {pakc.Data} shows up on the workflow's card straight away instead of halfway through a run. (It can't check the property after the dot: {pack.Data.Cuont} just comes out empty.)
There's no maths in a workflow file, and no loops. When something needs working out, a small script step works it out and hands back the answer. That keeps workflows easy to read, and keeps the clever bits in scripts you can test on their own.
Every input type a workflow's form can have
A workflow lists its form in Inputs, one entry per field: @{ Name = 'Servers'; Type = 'List'; Default = 'localhost'; Help = 'One per line' }.
Type | The field | What {input.Name} passes on |
|---|---|---|
Text (the default) | a text box | the text |
Number | a number field | a number |
Toggle | a toggle | $true or $false |
Choice (with Choices = @(...)) | a dropdown | the chosen value |
File / Folder | a file / folder picker | the path |
List | a box, one item per line | an array of the lines |
Csv | a file picker for a .csv | the file's rows, as objects |
Every reference you can use
| Reference | What it gives |
|---|---|
{input.Site} | a value from the form at the start (a List input is a list, a Csv input its rows) |
{scan.Data}, {scan.Data.Path} | what a script step returned, or one property of it (of every row, for a list) |
{scan.Message}, {scan.Status} | the step's result sentence and status |
{other.Data.Server} | what the person typed at an Input step |
{pick.Data} | the rows picked at a Review step |
{wifi.Data.Answer} | the choice made at an Ask step |
{approve.Data.By}, .Comment | who approved, and what they wrote |
A reference that comes out empty leaves that parameter out, so the script uses its own default. References work in Params, in When conditions, in done: and fail: messages, and in the questions a step asks.
Decide later
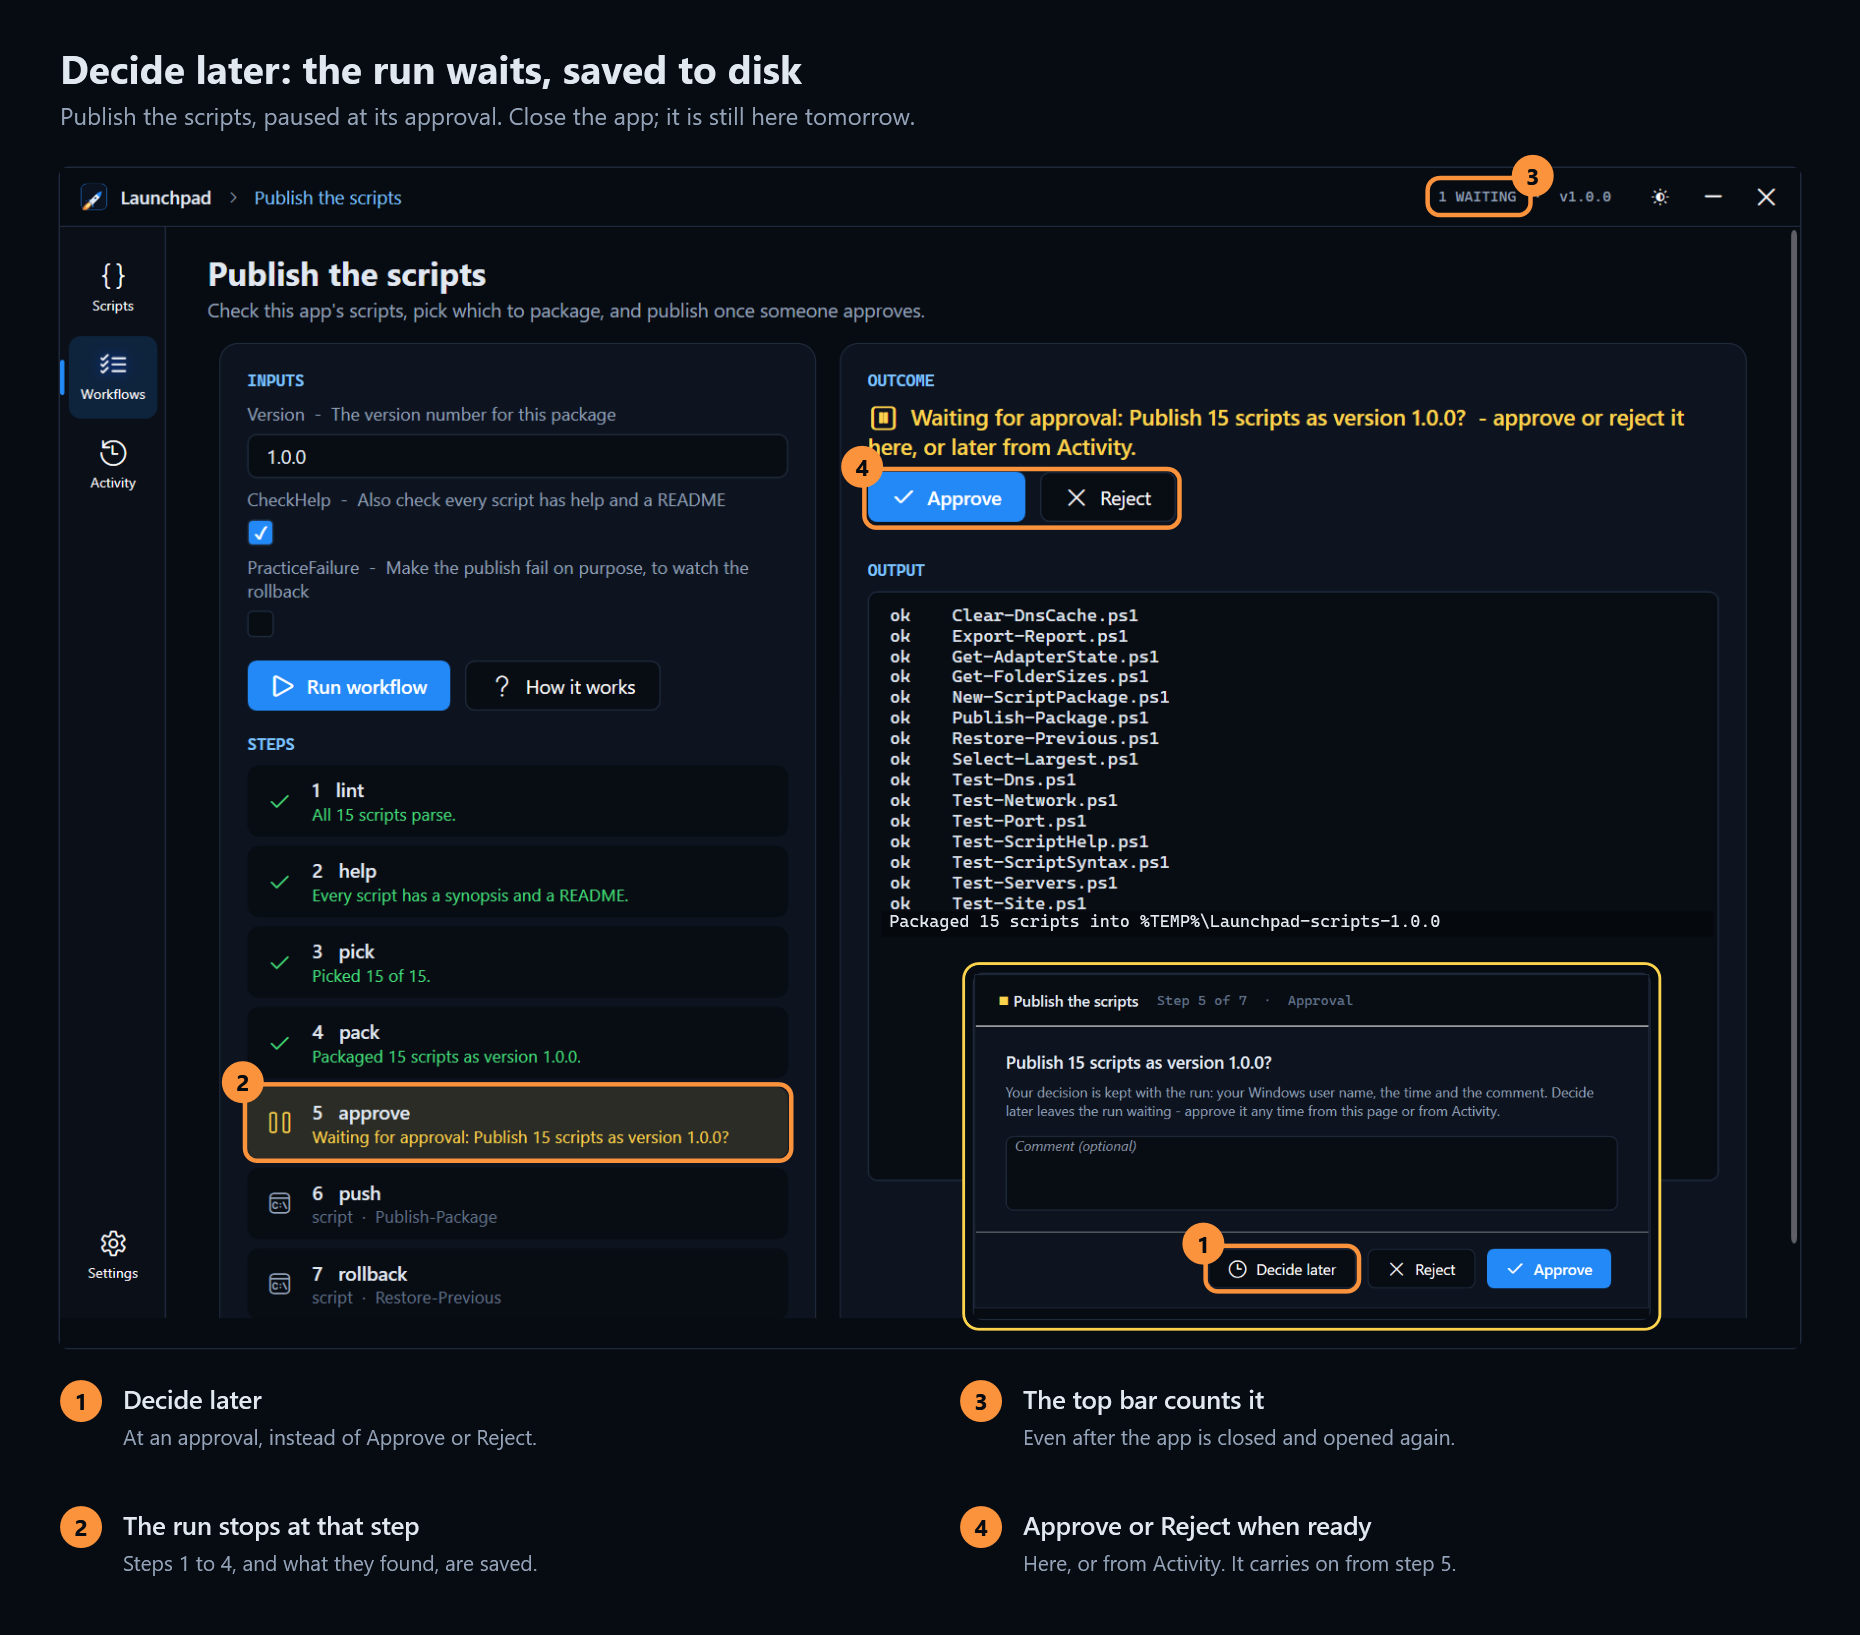
That's the Publish workflow from the samples, paused at its approval. An approval doesn't have to happen now. Choose Decide later (1) and the run pauses at that step (2), saved to disk with everything it has done so far. Close the app, go home, come back on Monday: the top bar still counts it (3), and the run is waiting on the Activity page. Approve it (4) and it carries on from the approval, with all the same values. The decision is kept with the run, so there's always a record of who said yes, and when.
4. Keeping it tidy and safe
- Activity keeps every run: what ran, what each step did, and what it handed on. Click a step to see its own output.
- Settings (the gear at the bottom of the rail) clears old history and opens the app's folders.
Check.ps1checks everything without opening a window: every script parses, every workflow's steps and references line up. Run it before you hand a copy to anyone.- The content folder is the trust boundary. A script runs with the rights of whoever clicks Run, so let people read the folder and only maintainers write to it. If you want more,
RequireSigned = $trueinconfig.psd1runs only signed scripts, andTimeoutMinutesstops a script that runs away. Every run has a Cancel button too.
5. Making it yours
- Copy the folder and rename it. Set
TitleandAppIdinApp\config.psd1, and swap in your own icon. Copied out of the PoshUI release, it needs PoshUI beside it: put thePoshUI.Canvasfolder andbin\into aruntime\folder, then rebuild the launcher withNew-PoshUIApp(App\README.md, Taking it out of the PoshUI folder, has the exact steps). - Replace the content. The sample scripts and workflows are stand-ins: delete them, and copy
Test-Portas the start of each script of your own. Its comments point out every part. - Run
Check.ps1until it says Ready. - Leave the code alone until you really need to change how the app behaves. Most teams never do.
Launchpad leaves some things out on purpose: schedules, running on other machines, approvals by someone other than the person at the keyboard. Each one is a real need somewhere, and each one would double the size of a file. If you need one, it has an obvious home, and the next section shows where.
Under the hood
This part is for when you want to change the app itself, or build your own the same way. You don't need it to use Launchpad, write scripts, or write workflows.
The engine knows nothing about the window. App\lib\Runner.ps1 finds, checks and runs scripts and workflows, and keeps the run history. It never touches the UI. Anything the window needs comes back through callbacks ("here's a line of output", "this step finished", "I need an approval"). That's why Check.ps1 and the tests in App\Tests can drive it without a window, and why you can try a change from a console first (Windows PowerShell, in the Launchpad folder):
. .\App\lib\Runner.ps1
$s = Get-RunnerScript .\Content\scripts
Invoke-RunnerScript ($s | Where-Object Name -eq 'Test-Port') @{ Computer = 'localhost' } $env:TEMP
Pages are built from the content. Categories come from .COMPONENT, forms from param(), "Used by" from reading the workflows. There's no list of scripts in the front end anywhere. When you add a feature, look for a convention the content can carry (a help keyword, a #Requires) before you reach for a list in the code.
Runs are remembered on disk, not in the page. Each run writes a small record as it goes. Leave a page and come back, and it reads the record and redraws itself. That's what lets a run carry on while you look at something else, and what lets Decide later survive a restart.
A button's action is written out as text. PoshUI runs button actions in the background so the window stays responsive, and the background can't see the variables of the file that built the page. So Launchpad writes what each action needs into the action itself. In the code that looks like [scriptblock]::Create(@"...") with backticks before some $ signs. It's the one PoshUI pattern worth getting comfortable with, and there's a comment in Launchpad.ps1, under helpers for button actions ("THE PATTERN THIS FILE IS BUILT ON"), that walks through it.
| You want to change | Look in |
|---|---|
| The Scripts, Activity or Settings pages | App\Launchpad.ps1 |
| A workflow's page, its step windows | App\ui\WorkflowPage.ps1 |
| How scripts are found, run and stopped; the workflow engine; run history | App\lib\Runner.ps1 |
| The top bar and the rail | App\ui\Shell.ps1 |
| Colours, light and dark | App\ui\Theme.ps1 |
| The rocket | App\ui\Splash.ps1 (delete it and the app opens straight on Scripts) |
The App\README.md inside the example is the maintainer's reference: every setting, every step option, every check, in full.
Launchpad is in Examples\Launchpad\ in the release package.